
Greenland Grandeur: Ice, Water and Northern Lights
Earlier this year, I was fortunate to spend an entire month in Greenland, a place that feels like my second home. This trip, which marked my 6th visit to the island country known as Kalaallit Nunaat in Greenlandic and Grønland in Danish, involved leading two OFFBEAT photography workshops in familiar locations and working on a tourism photography project at a destination that was new to me. Despite revisiting several places, natural wonders such as ice, water, and northern lights made each experience unique.
Earlier this year, I was fortunate to spend an entire month in Greenland, a place that feels like my second home. This trip, which marked my 6th visit to the island country known as Kalaallit Nunaat in Greenlandic and Grønland in Danish, involved leading two OFFBEAT photography workshops in familiar locations and working on a tourism photography project at a destination that was new to me. Despite revisiting several places, natural wonders such as ice, water, and northern lights made each experience unique.
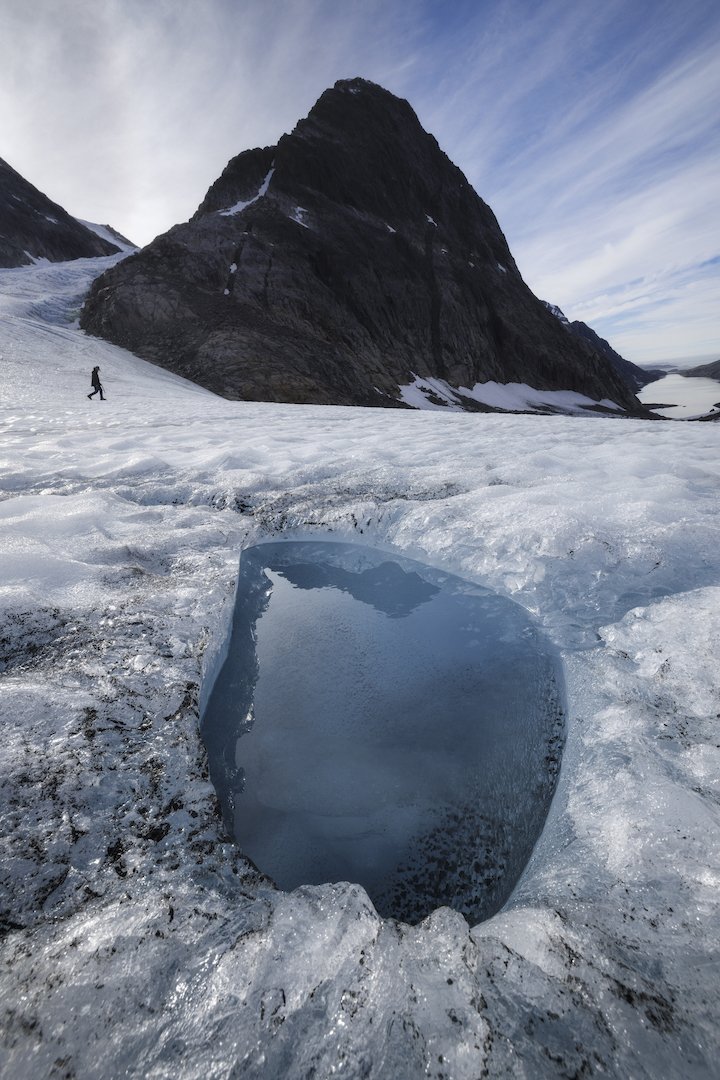
I arrived in Ilulissat for the first edition of the Greenland Grandeur workshop alongside fellow trip leaders Curtis Jones and Stephen DesRoches. We had each made numerous trips there and all agreed that we had never seen so much ice there before. Considering the recent launch of my Cryophilia project, which revolves around documenting disappearing glaciers and ice, I was excited for the photo possibilities. I was also thrilled for the participants who arrived a few days after we did.
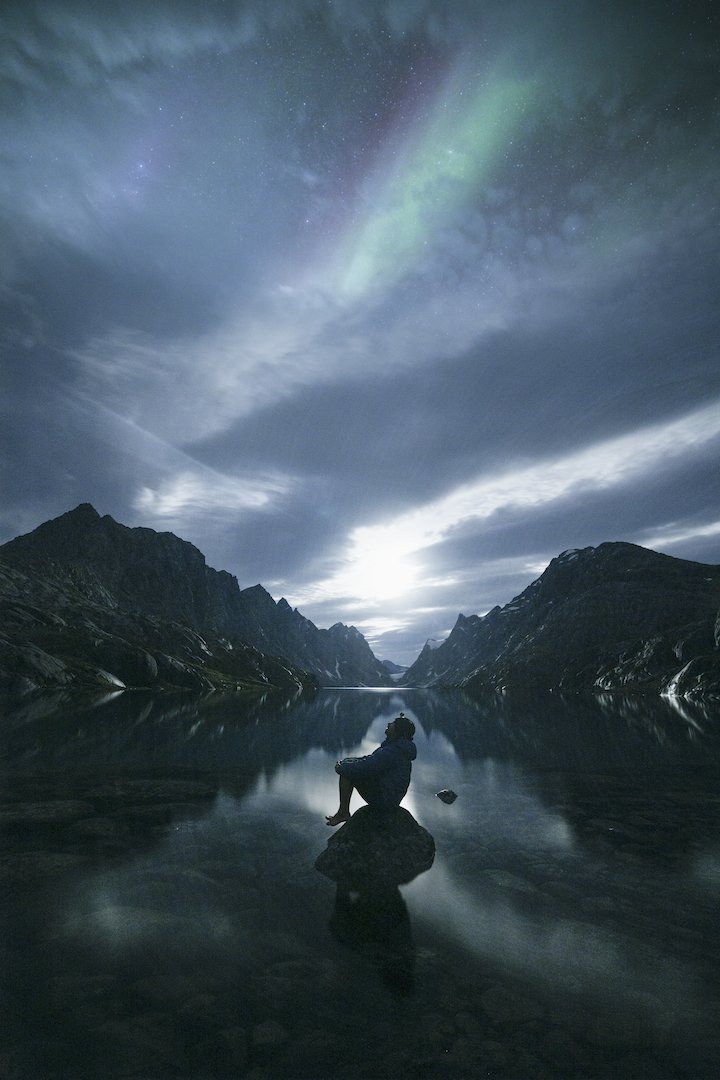
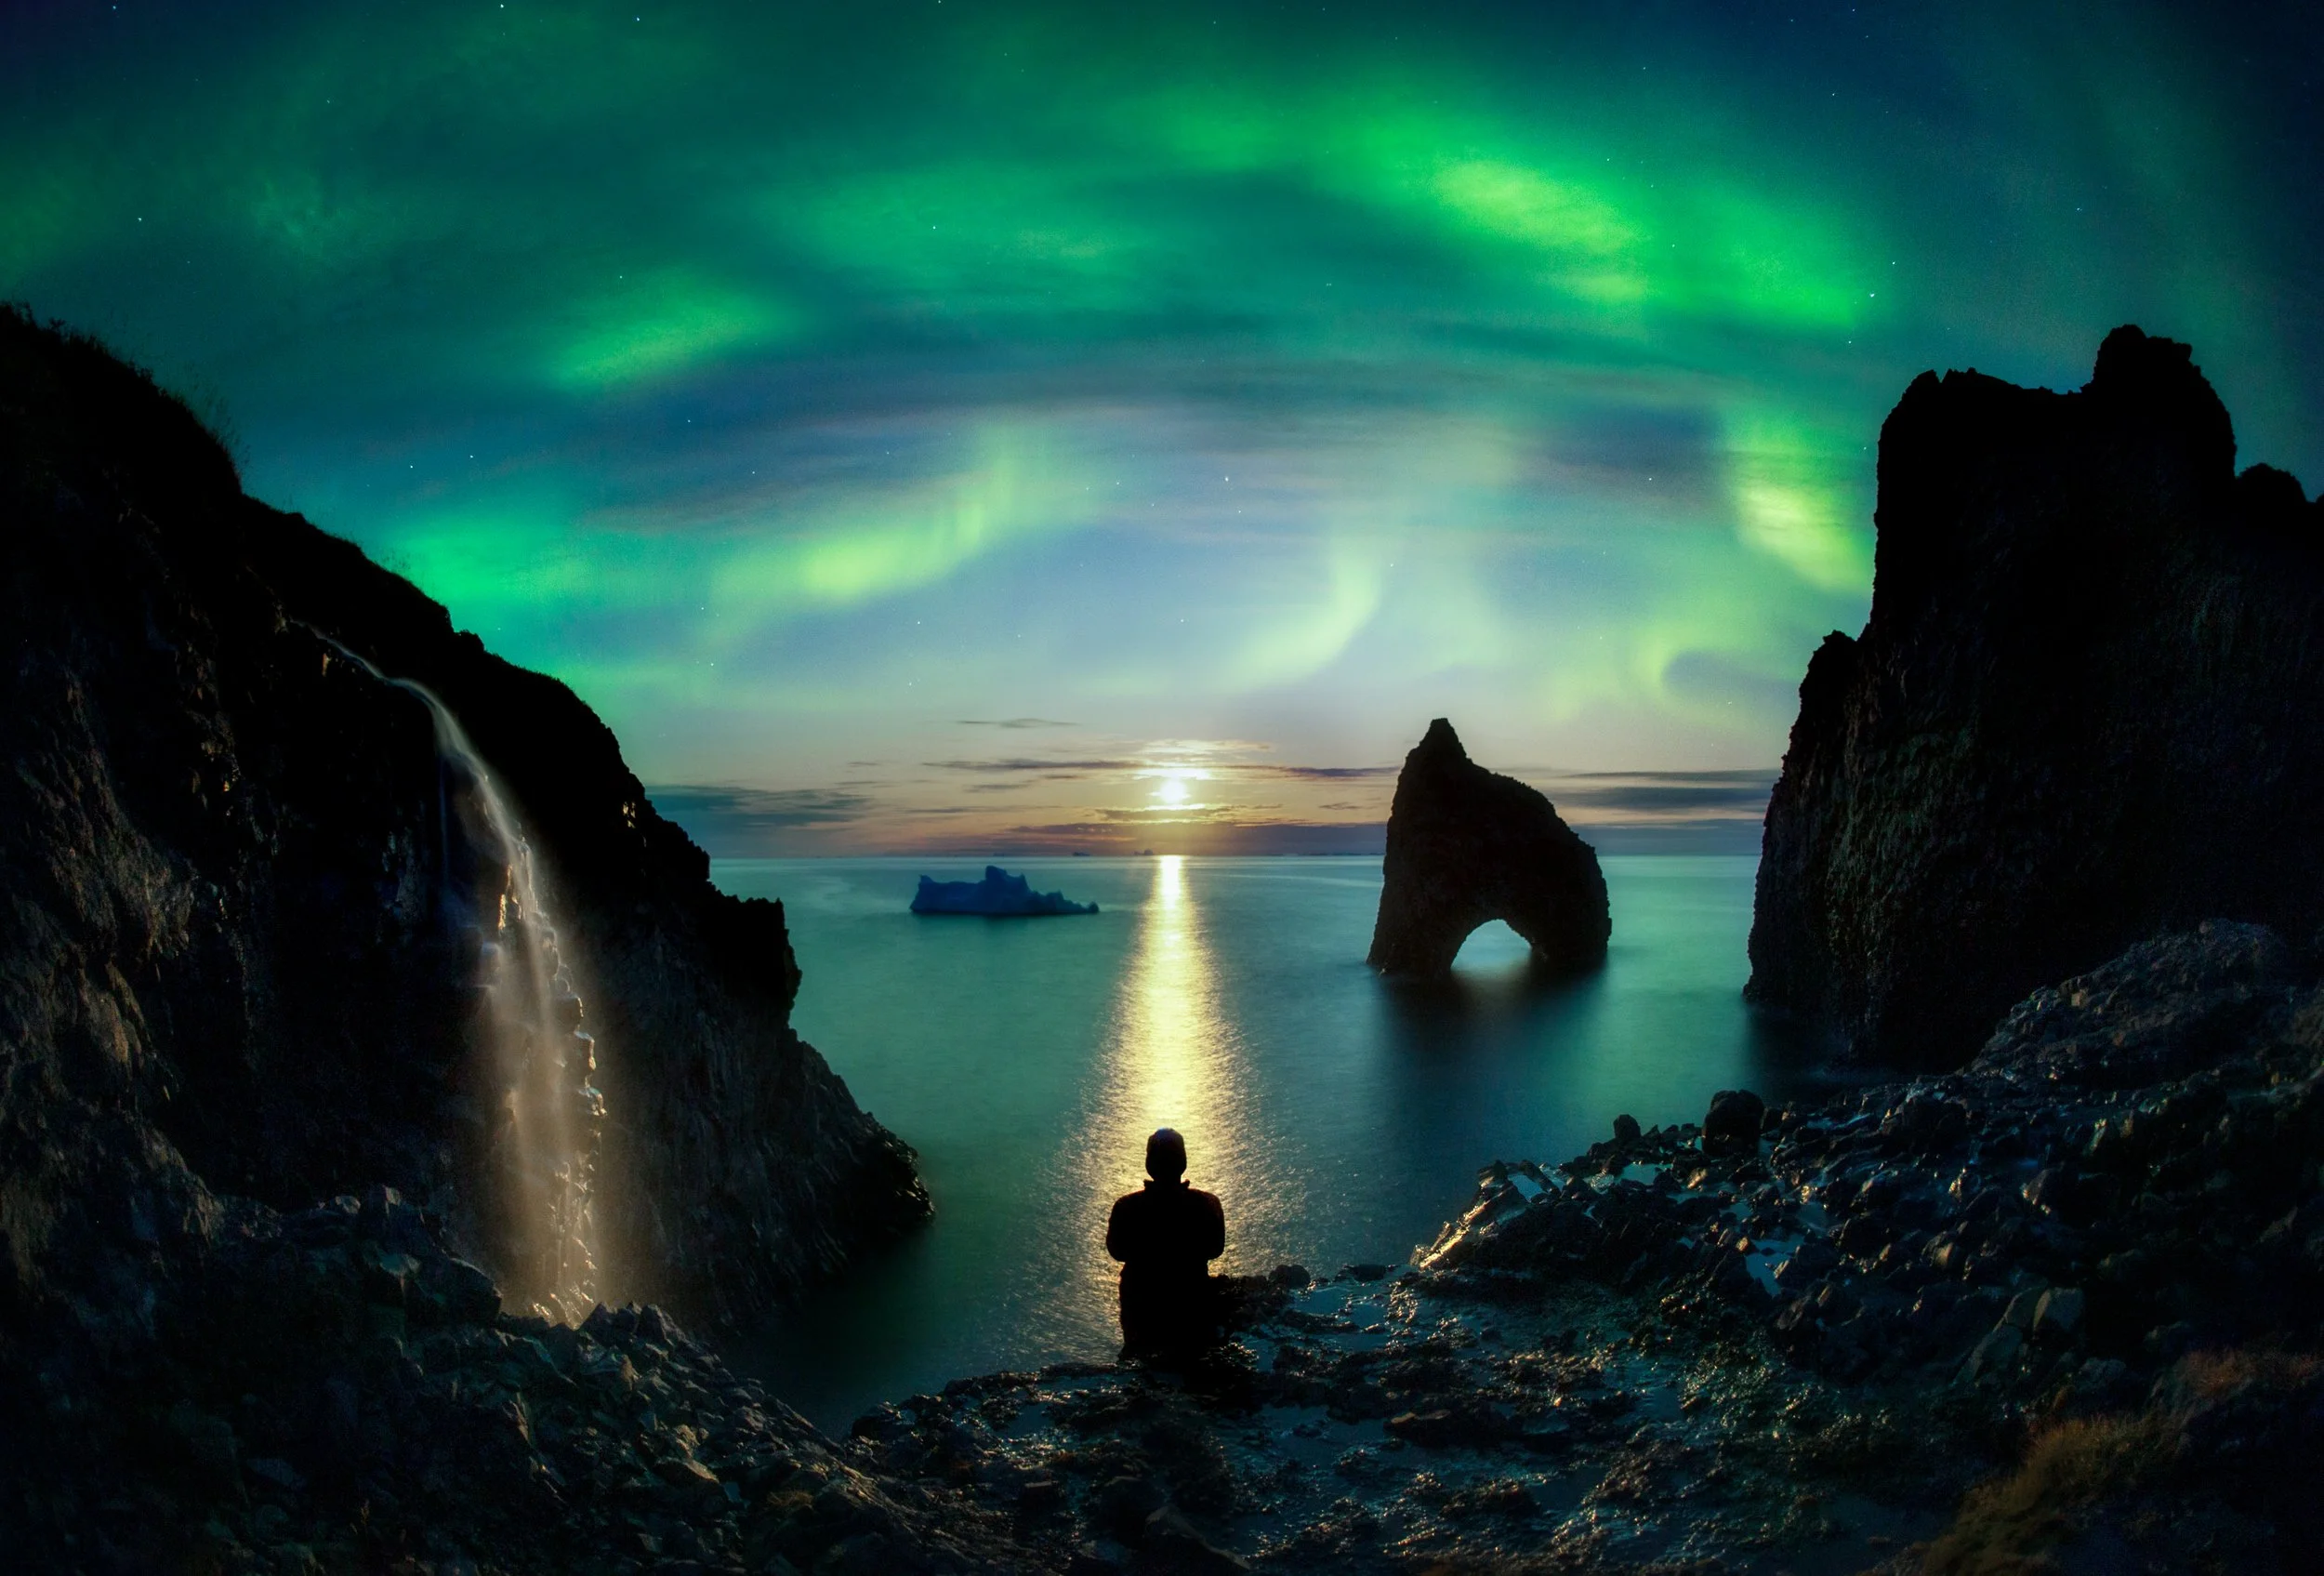
During the first half of the workshop, we focused our attention on the sea ice in the fjords of Ilulissat and were treated to an incredible aurora display. We then took a ferry to Disko Island, where we photographed black sand beaches and Kuannit, my favourite stretch of coastline in the world. Foul weather sent us back to Ilulissat early, but the consolation prize was documenting more incredible ice formations around Ilulissat.

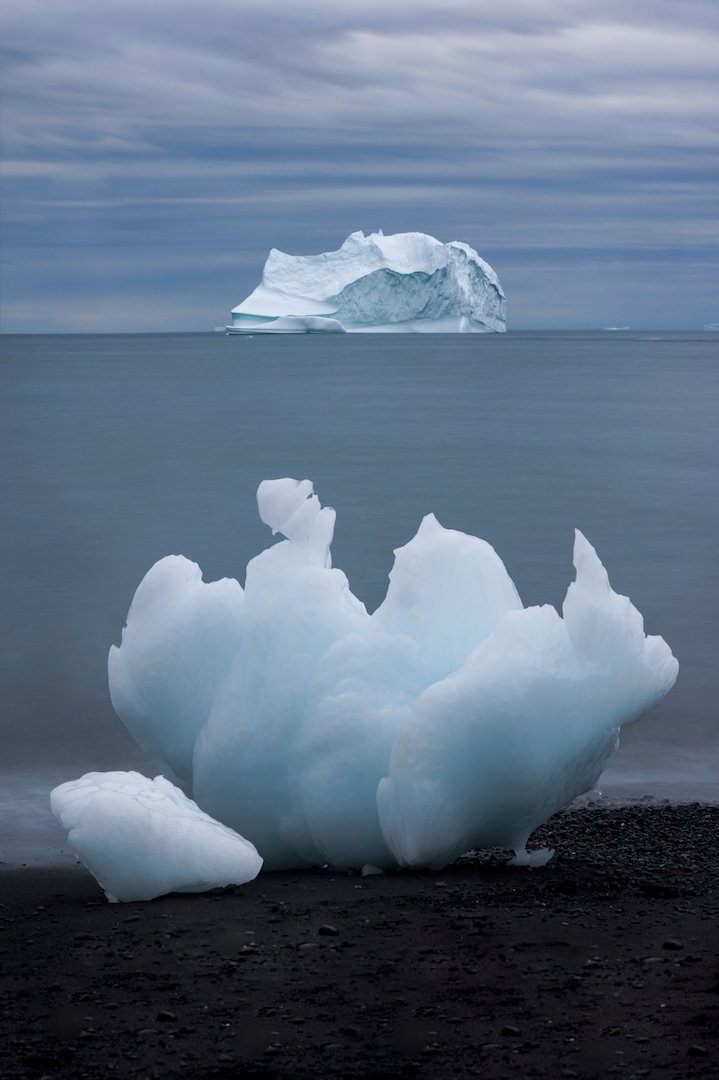
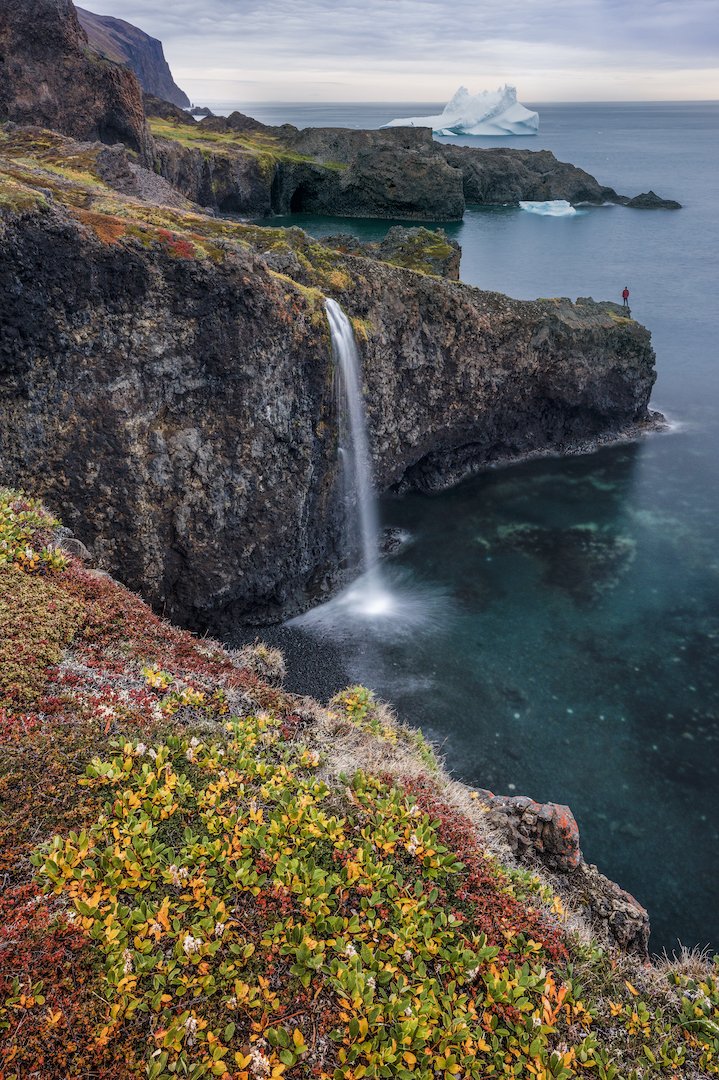
Gargantuan ice formations off the coast of Greenland.
The second workshop brought lots of familiar faces to Greenland. Participants were treated to an incredible aurora display upon arrival, before the workshop had officially started. With a wide spectrum of colours filling the sky, it was possibly the best aurora display of the entire month. The workshop program mirrored the first and it mostly went according to plan; the only curveball was that during our stay on Disko Island, Greenland got the biggest rain event it’s seen in over 40 years.
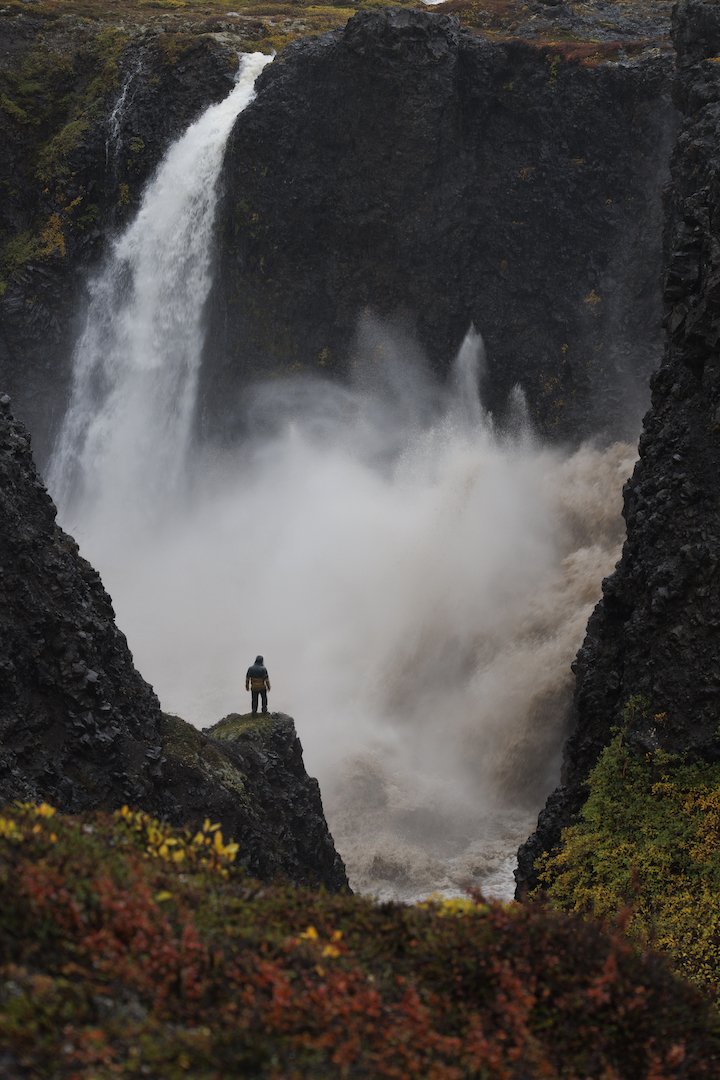
We may have been damp but we kept our spirits high and continued getting out regardless of the downpour. When the weather does unexpected things, it also leads to unexpected photo ops. We witnessed some beautiful things including the area’s waterfalls flowing at ten times the volume and unusual chocolate-coloured water flowing onto the beach and into the iceberg-laden sea. We made the most of it before heading back to Ilulissat to wrap up the program.

A rare combination: chocolate-coloured waves and a black sand beach.
Curtis, Stephen and I stayed on for a few extra days. We called this period “play time” but we are actually heading to Maniitsoq in western Greenland on an assignment for Destination Arctic Circle and Visit Greenland. We were thrilled to explore a place that none of us had seen before, especially since the few photos of Maniitsoq we could find were oozing with potential. Although harsh weather caused travel delays that cut our play time in half, we decided to head to Maniitsoq anyway. We were greeted by Ole from Maniitsoq Adventure Tours who sailed us to Inussuit Tasersuat, a narrow lake flanked by steep mountain ranges known as “The Great Lake of Giants”.
The instant we laid eyes on Inussuit Tasersuat, we unanimously agreed it was one of the most beautiful places we had ever seen. I was so blown away by the possibilities, I didn’t know where to start. It was one of the most epic places I’d ever seen and I wanted to do it justice by conveying that ‘wow factor’. We got to work right away and shot the lake from a variety of angles in diverse conditions. We shot it by day and night, from land and underwater, with a drone and even from kayaks provided by Ole. We even witnessed the aurora shimmering high above the landscape, but for me, the highlight was doing a full traverse of the lake in a kayak on a calm morning surrounded by towering peaks, glaciers, and their reflections. Inussuit Tasersuat is one of the most naturally beautiful places I’ve ever come across and I hope I’ll be lucky enough to return there one day.

Inussuit Tasersuat, also known as “The Great Lake of Giants”.
Both workshops and our playtime unfolded in phenomenal landscapes. Photographs allow me to share the majesty of these scenes, but they don’t convey the meaningful conversations we shared with the locals we encountered. Considering that three quarters of Greenland is covered by the only permanent ice sheet that exists outside Antarctica, I asked locals like Ole and our boat drivers about the changes to the ice that they’ve witnessed in their lifetimes. They all told us that the glaciers are receding at an alarming and unprecedented rate. Hearing this underscored what a privilege it is to be able to see and document that ice before it disappears. I hope you enjoy these images, but most of all, I hope they spark your curiosity about our planet’s vanishing ice.


5 Tips for Viewing and Photographing the Northern Lights
In my mind, few natural phenomena match the magic or grandeur of the aurora borealis. I’ve been actively chasing this natural wonder, also known as the Northern Lights, for over a decade. Based on my experience chasing the lights, here are my top 5 tips for increasing your chances of viewing and/or photographing the northern lights.
In my mind, few natural phenomena match the magic or grandeur of the aurora borealis. I’ve been actively chasing this natural wonder, also known as the Northern Lights, for over a decade. I’ve witnessed the lights materialize in an array of colours—green, purple, pink, reddish, and white—in a variety of patterns and effects, from flashing and pulsing shapes to softly flowing ribbons of light.
How does the aurora borealis occur? Here’s the oversimplified version: when charged particles from the sun strike atoms in Earth’s atmosphere, they cause electrons in the atoms to move to a higher-energy state. When the electrons drop back to a lower energy state, they release photons (light). The wavelength of the photon determines the colour we will see, and the wavelength of the photon depends on the gas that’s being excited. Oxygen will emit green/yellow or red, ionized nitrogen will emit purple, nitrogen will emit light blue, and the other colours are caused by a blending of the two, among other factors.
Understanding the science behind the northern lights doesn’t guarantee that you will be able to see or photograph them. Based on my experience chasing the lights, here are my top 5 tips for increasing your chances of viewing and/or photographing the northern lights.
For a deeper look including tips for reading data, post-processing tips, and a thorough list of resources, check out my eBook: Guide to Viewing and Photographing the Northern Lights (use checkout code AURORAWATCH15 to save 15%!)
1. Understand Your Chances
Your chances of catching the northern lights depend on four factors aligning:
Northern lights activity
Clear skies
Unobstructed views north
Little light pollution.
Put simply, you need the lights to be active, but you also need to be able to see them.

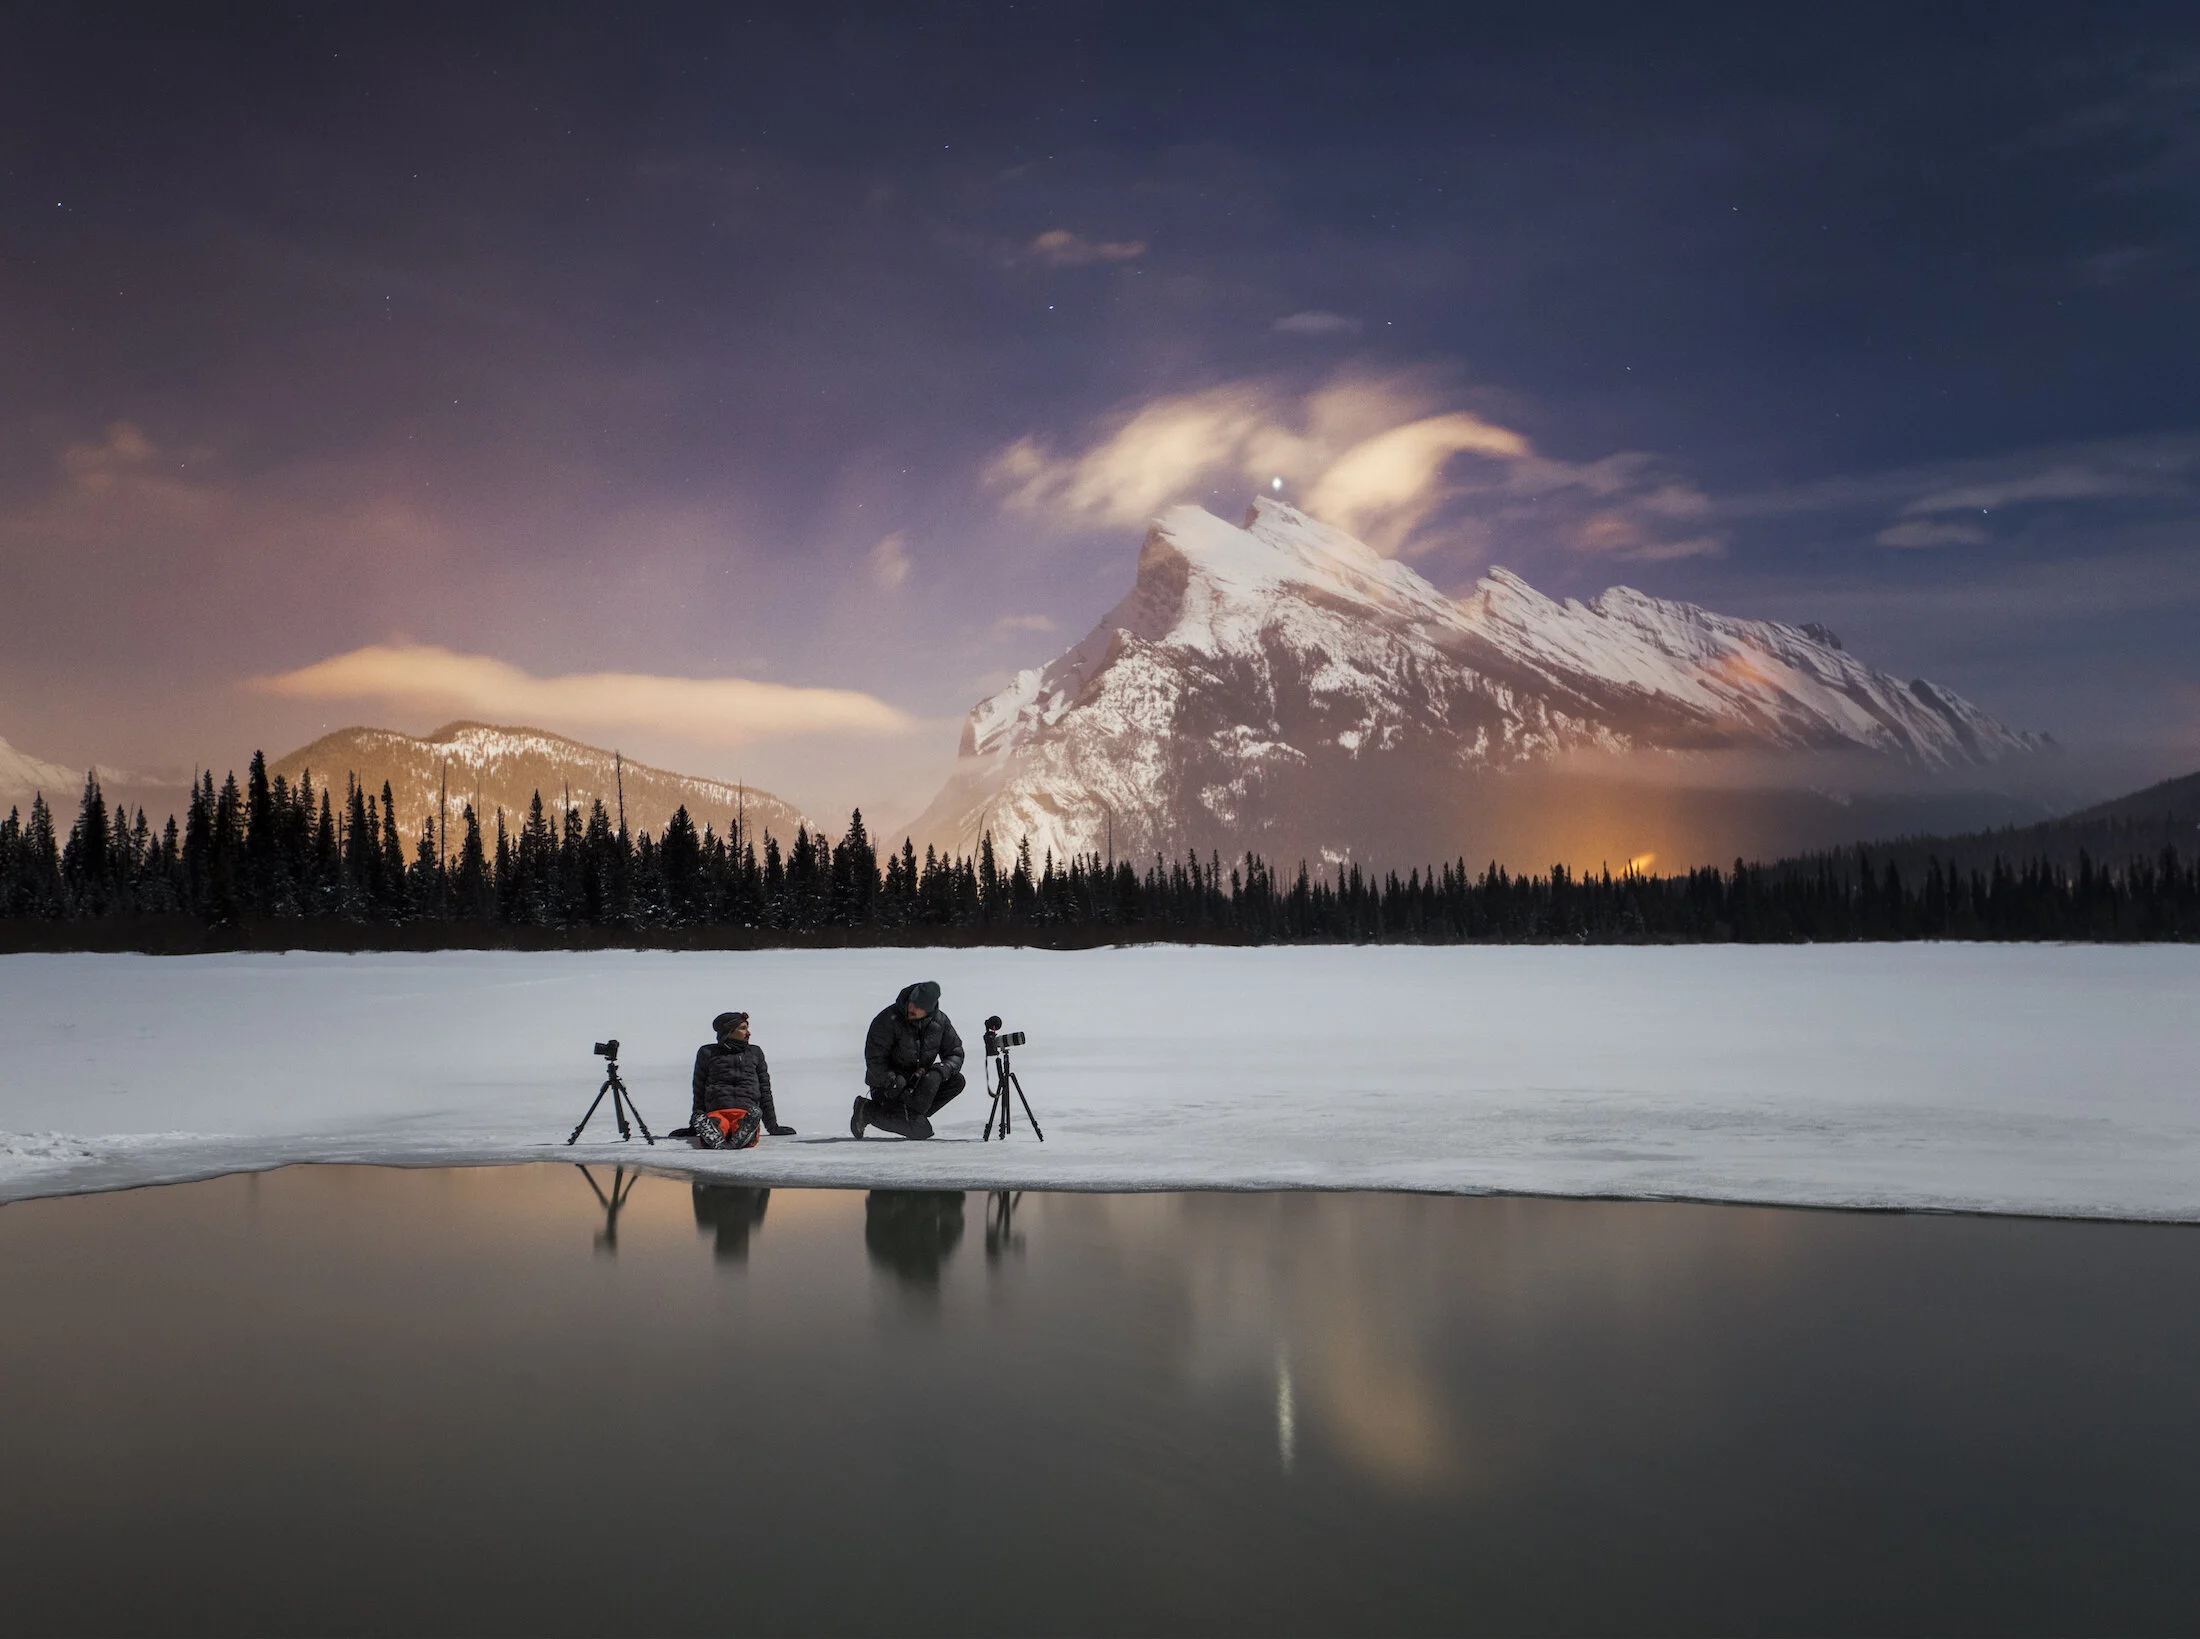
Vermilion Lakes and Mount Rundle, Banff National Park. Photo by Paul Zizka.
2. Get the Right Tools for the Job
Set yourself up for success with the tools and gear that will help you achieve your goal. It doesn’t necessarily need to be the latest or most expensive gear either.
For viewing the northern lights, you’ll need:
A headlamp to help you navigate in the dark.
Access to aurora data or experts (find a list in my eBook!)
Don’t leave without gear and clothing to keep you comfortable including warm layers, warm footwear (cold feet are the beginning of the end!), and hand warmers or heating packs.
For photographing the northern lights:
A DSLR or mirrorless camera that can handle low-light situations
A lens with a fast aperture (ideally 2.8) and wide field of view (ie. 14-18 mm on a full-frame camera)
A sturdy tripod that you can adjust efficiently
For self-portraits or time-lapse: An intervalometer that enables you to program exposures ahead of time (some cameras have this built-in)
A bright headlamp (ideally 200 lumens+ with various beam shapes and power levels plus a red light setting) is useful for focusing images or illuminating subjects. Extra light sources like a Lume Cube can also be handy.
Use code PAULZIZKAPHOTO to save 10% on Lume Cube products.

Self-portrait, Banff National Park. Photo by Paul Zizka.
3. Plan Ahead
Preparation is key, especially when you want to savour every moment the lights are dancing above you.
Scout north-facing locations in the daytime to get a lay of the land and keep a few of these locations in your back pocket. Photographers may even wish to create a visual inventory of compositions in each bookmarked location.
Have a safety plan in place, particularly if you’re going to a remote location on a cold night. This includes packing a first-aid kit, means of communication, and bear spray as well as letting someone at home know what your plans are.
It’s best to be ready for the northern lights at a moment’s notice. Keep your devices and batteries fully charged so they are ready to grab and go at a moment’s notice. It’s also helpful to store spare batteries in warm pockets while in the field.

Ice climber under the aurora. Photo by Paul Zizka.
4. Take Technical Considerations
Photographers chasing the northern lights should keep in mind that night photography can be challenging and time-consuming. Here are some tips that have helped me come away with better images:
Shoot raw to give yourself as much data to work with in the editing room.
Rely on your histogram rather than your LCD to avoid going home with overly dark images.
Turn off auto ISO and shoot in manual mode. I’ve found that taking full control of the settings works better in night photography situations.
Use your lens hood to block stray light.
Use a two-second timer or trigger the shot with an intervalometer as the act of pressing the shutter button can be enough to introduce camera shake.
Download my eBook: Guide to Viewing and Photographing the Northern Lights where I provide my starting settings to help to you get off on the right foot. (Use checkout code AURORAWATCH15 to save 15%!)

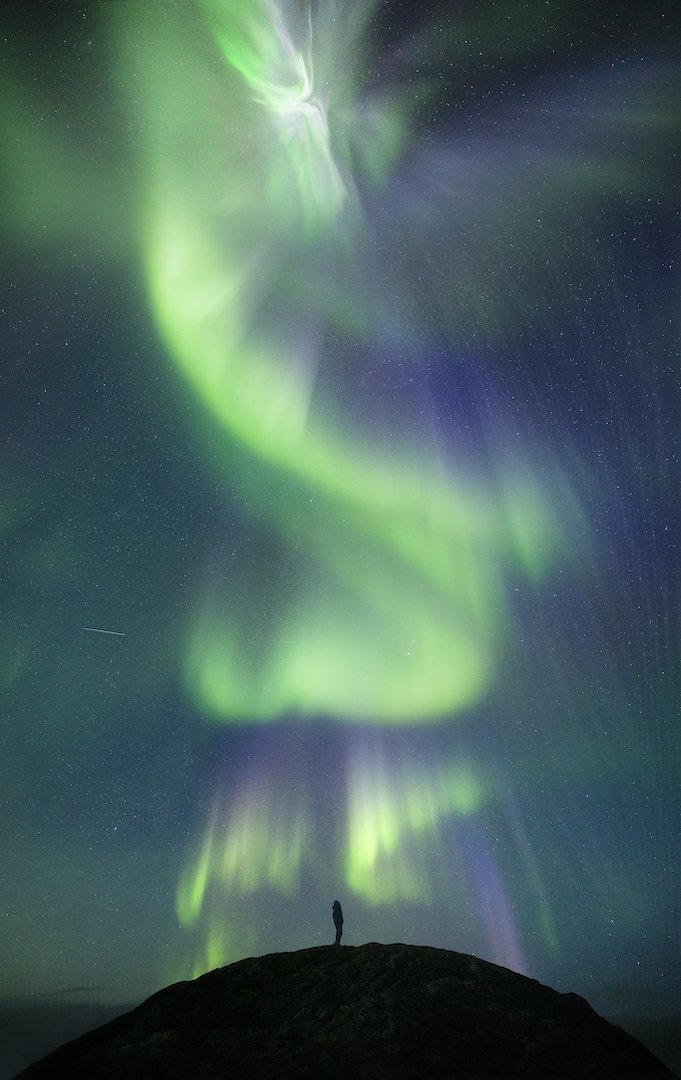
A curtain of lights in Greenland. Photo by Paul Zizka.
5. Commit the Time
Remember that catching the aurora borealis requires patience and persistence. There are so many factors that need to align to catch a good show, so don’t be discouraged if it takes multiple tries. Enjoy the thrill of the chase and stick with it!
Walking away from a northern lights show with strong photographs takes time too. The “spray and pray” technique that is often employed during the day simply doesn’t work at night due to the time-consuming nature of long exposures and astrophotography. Don’t be afraid to commit as much as 30 minutes to a single frame. The more you practice, the more efficient you will be when Mother Nature shows off her beauty.
And whatever the results, I hope you’ll put your experience in nature ahead of the images.

Daughter’s first aurora. Self-portrait by Paul Zizka.
For a deeper look including tips for reading data, post-processing tips, and a thorough list of resources, check out my eBook: Guide to Viewing and Photographing the Northern Lights (use checkout code AURORAWATCH15 to save 15%!)
Learn more:
Take a peek at my gear list to see what I rely on in the field.
Learn astrophotography techniques in-person at my Banff at Night workshop or online through my Shooting Stars: The Art of Astrophotography course.
Check out my 10 Favourite Places to Shoot the Northern Lights.

Photo Tips for Capturing the Northern Lights
I frequently get asked for tips on how to photograph the aurora borealis. Capturing the dancing lights is a fine science of checking the data, ensuring you have optimal conditions, knowing your gear, and being ready to wait... and wait... and wait. It takes patience to capture that green glow and come home with images you're happy with. Here are some of my best tips.
I frequently get asked for tips on how to photograph the aurora borealis. I’ve written a whole eBook about it (check out Paul Zizka’s Guide to Viewing and Photographing Northern Lights), but here’s a little snippet for you! Capturing the dancing lights is a fine science of checking the data, ensuring you have optimal conditions, knowing your gear, and being ready to wait... and wait... and wait. It takes patience to capture that green glow and come home with images you're happy with.
Here are some of my best tips:
1. Don’t forget everything else you know about photography.
The first time you shoot the lights, you’ll probably be thrilled with any image that shows a touch of green. Focusing, composing, etc. are afterthoughts. With time, though, try to reintegrate all of the other photographic skills you’ve acquired on your journey. Shoot the way you would anything else: compose with intention, pay attention to flow and weight in your composition, get to know your subject, simplify, see if you can tie in that aurora with a foreground. A well-executed image of a weak aurora showing is more powerful than a clunky shot with a powerful display.
→ Save 25% off my online astrophotography course:
Shooting Stars: The Art of Astrophotography (just $36.75 CAD)
2. Be adaptable.
The aurora is a fickle phenomenon. Not only does it constantly appear and disappear, but it can also move around in the sky. And sometimes it doesn’t show up at all! Whatever hand you are dealt out there, make the most of it. If the lights don’t appear, strive to create and go home with the memories of a beautiful night out. If the lights move outside of your frame by the time you’re ready to shoot, take it as a great test on your way to become a versatile, quick-thinking photographer.
3. Don’t go home with overly dark images.
This is a very common pitfall for most aurora photographers. Because we are surrounded by darkness, the image that first pops up on our LCD can look much brighter than it actually is. In fact, it may be severely underexposed, a fact you might only realize too late once you’re sitting at home. An easy way to avoid that issue is to rely on the histogram to get a true representation of how bright your image really is. Often I find people are quite surprised to find that they need to at least double their shutter speed or ISO.
Coming to the Rockies this year? The ebook contains an index of the best places to shoot the aurora borealis between Banff and Lake Louise (save 10% with the code AURORA). You might find some helpful tips in there!

Photo by Paul Zizka.
Did You Know?
The word "aurora" comes from the Roman goddess of the dawn, Aurora, who would travel east to west announcing the sun's arrival.
The cause is not 100% understood, but the Aurora Borealis (and Australis in the Southern Hemisphere) appear when solar wind (gas emitted by the Sun) interacts with the Earth's magnetosphere.
The colours are caused by various factors, such a whether electrons collide with oxygen or nitrogen and at what intensity. Oxygen will emit green/yellow or red; nitrogen will emit blue and the other colours are caused by a blending of the two.
Facts from Wiki.
More Reading
→ Check out my 10 Favourite Places to Shoot the Northern Lights
→ Check out these Aurora Watching Web Resources

10 Favourite Places to Shoot the Northern Lights
I’ll admit it: the northern lights are intoxicating. For many years I’ve been drawn to cold, northerly destinations, both as a photographer and an adventurer. And beyond the desolate beauty and landscapes of these locations, whether it’s Greenland or Canada’s northern territories, it’s icing on the cake that they also provide us with the best opportunities to shoot the aurora borealis.
I’ll admit it: the northern lights are intoxicating. For many years I’ve been drawn to cold, northerly destinations, both as a photographer and an adventurer. And beyond the desolate beauty and landscapes of these locations, whether it’s Greenland or Canada’s northern territories, it’s icing on the cake that they also provide us with the best opportunities to shoot the aurora borealis.
Here are my top 10 favourite locations around the globe to shoot the northern lights, in no particular order of preference:
1. Alaska
In a nutshell: Perfect latitude, fantastic scenery to pair up with lights. Cloud cover can be an issue.
When to go: October to March.

Denali National Park, Alaska, USA. Photo by Paul Zizka Photography.
2. Canadian Prairies
In a nutshell: Nice low horizon, easy access. You need a decent show.
When to go: Year-round.
Canadian Prairies. Photo by Paul Zizka Photography.
3. Canadian Rockies
In a nutshell: Some of the most incredible skylines to pair with lights. Great displays are rare. High horizons make it more challenging to shoot.
When to go: Year-round.

Banff National Park. Photo by Paul Zizka Photography.
→ Check out these Resources for Shooting the Canadian Rockies.
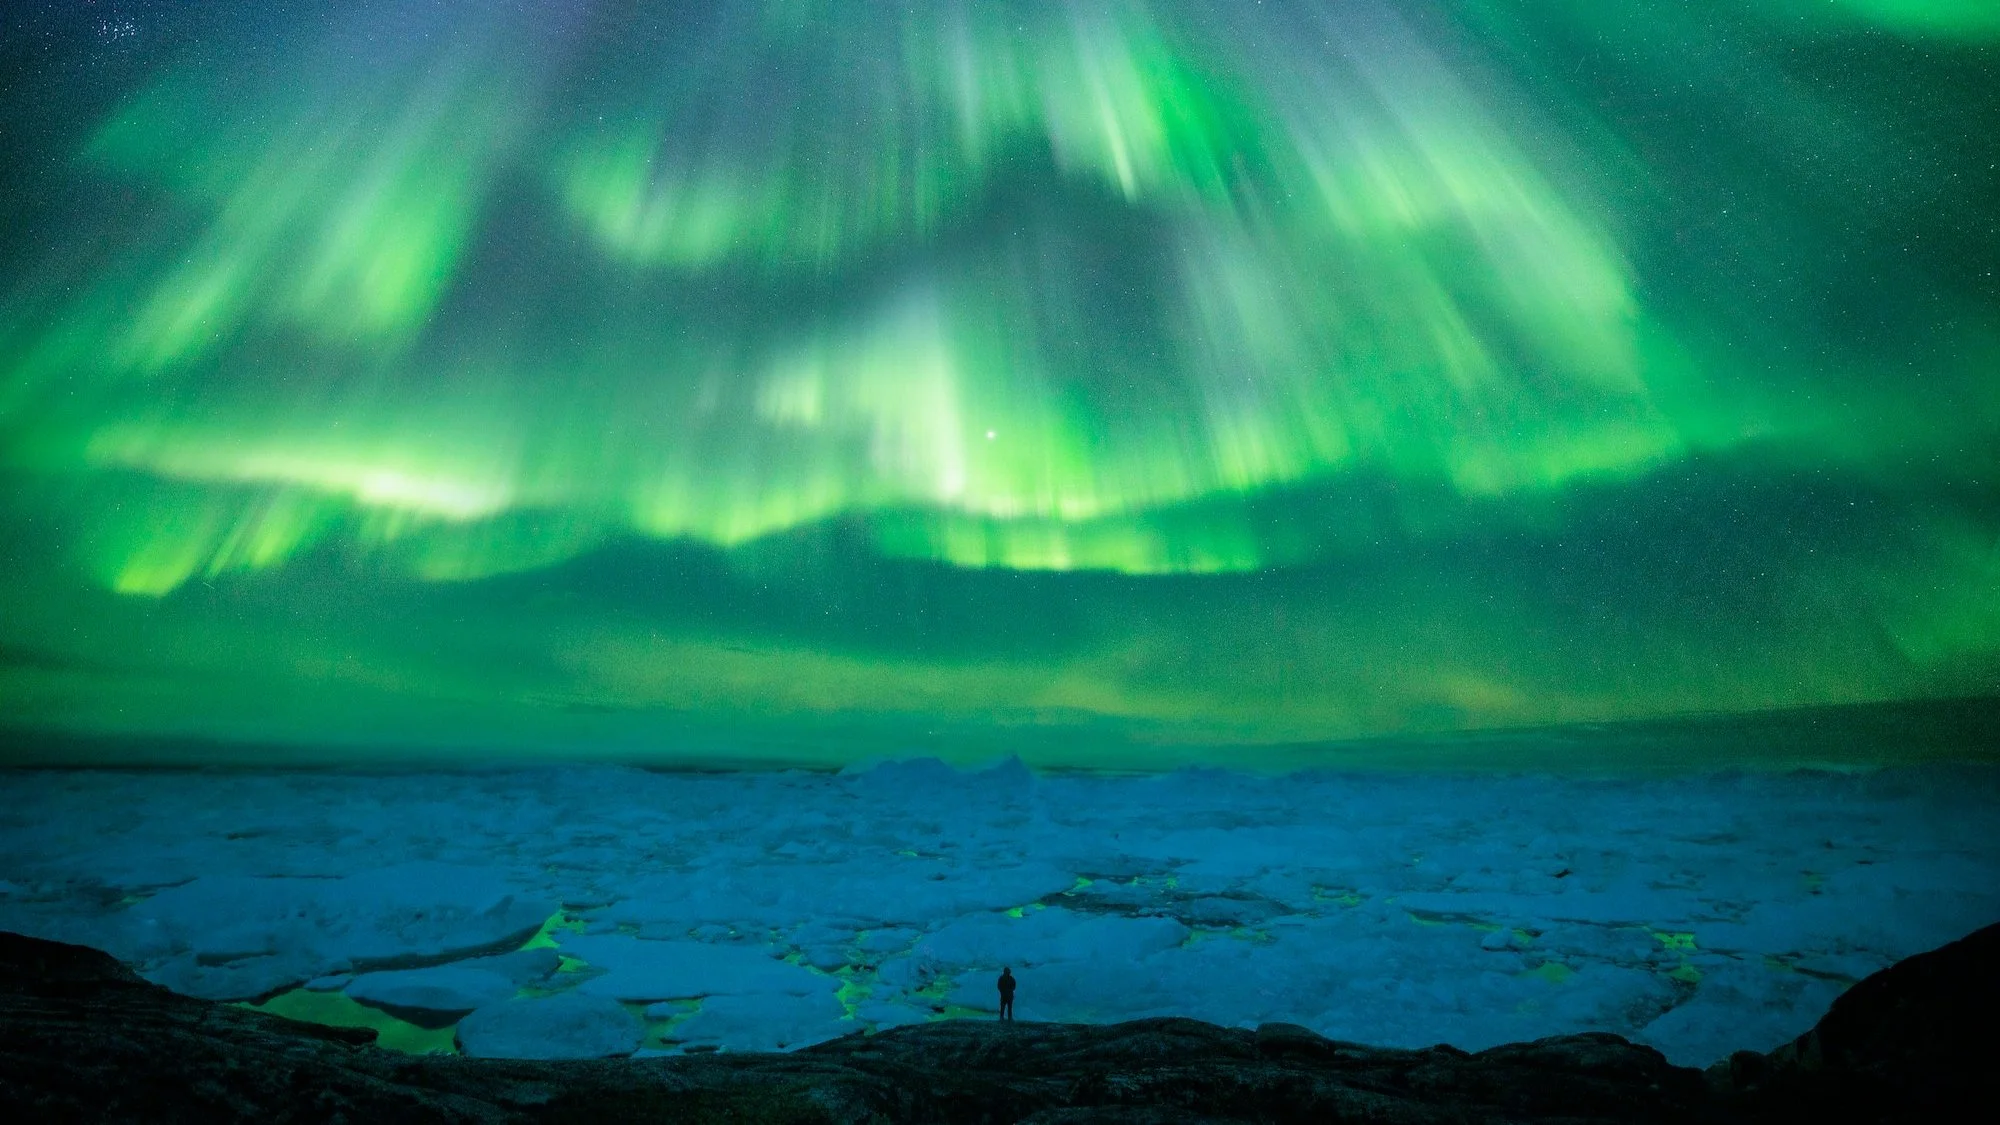
4. Greenland
In a nutshell: Zero light pollution, mind-blowing scenery. More difficult/expensive to access. Strong displays frequent.
When to go: September to April.
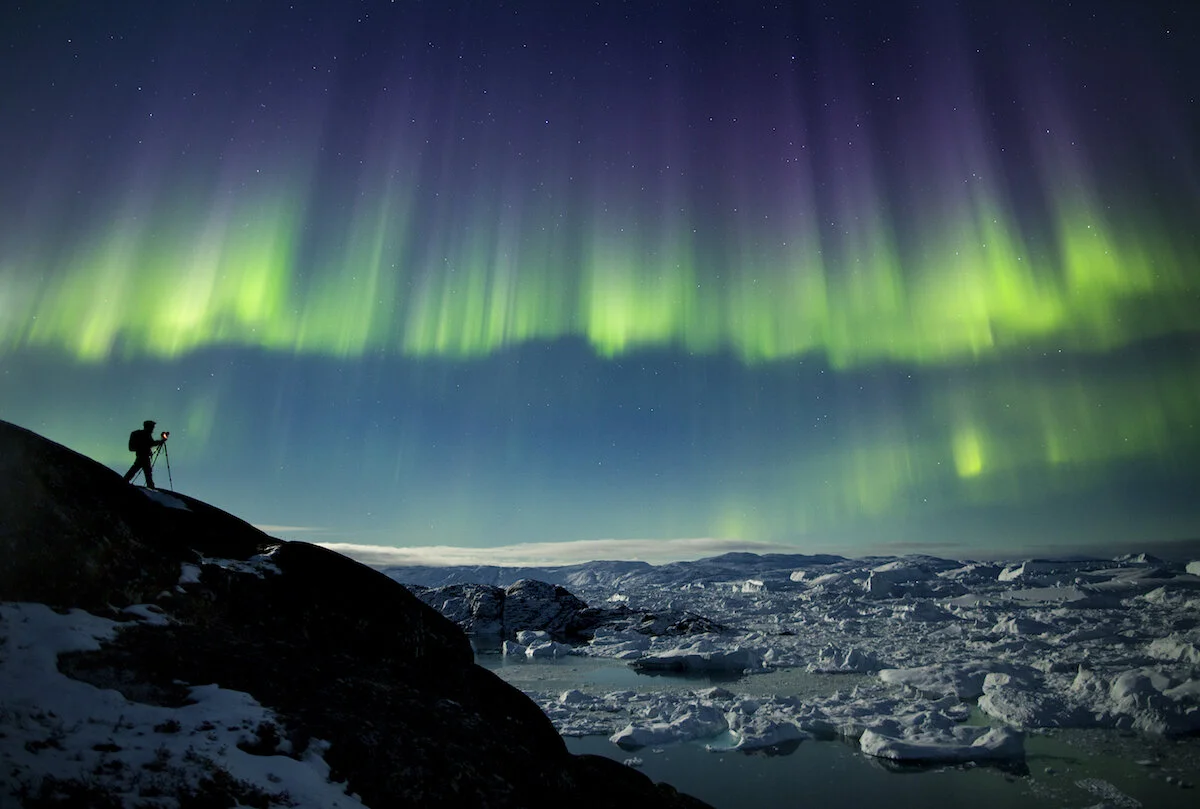
Greenland. Photo by Paul Zizka Photography.
→ You’ll also find my Aurora Watching Web Resources here.
5. Iceland
In a nutshell: Easier, cheaper access. Weather can be an issue. Good latitude, great landscapes. More people.
When to go: September to April.

Iceland. Photo by Paul Zizka Photography.
6. Labrador
In a nutshell: Super dark skies, very wild. Access can be difficult. Some incredible skylines.
When to go: September to April.

Torngat Mountains National Park. Photo by Paul Zizka Photography.
7. Norway
In a nutshell: Good latitude. Stunning landscapes. Weather can be an issue.
When to go: September to April.

Norway. Photo by Paul Zizka Photography.
8. Nunavut
In a nutshell: Very little light pollution, incredible scenery. Lower temperatures to deal with. More difficult/expensive to access. Strong displays frequent.
When to go: September to April.

Nunavut. Photo by Paul Zizka Photography.
9. Northwest Territories
In a nutshell: Very little light pollution, low horizons, surprisingly great access. Strong displays very frequent.
When to go: September to April.

Yellowknife, Northwest Territories. Photo by Paul Zizka Photography.
10. Yukon
In a nutshell: Very little light pollution, fairly easy/inexpensive access. Great latitude for aurora.
When to go: September to April.

→ Check out my Aurora Watching Web Resources